
Whether you are a minimalist or a maximalist with your holiday décor it is always nice to add a personal touch. Here is a stylish DIY to affordably customize your decorations this year. What I love most about this DIY is that you can work with what your holiday décor is currently and introduce whatever colour scheme works best for you.

For this DIY I’ve gone with untraditional metallics and blended them in with this wood garland to create a wood beaded garland.

To hang the garland on your mantle I like using semi-permanent hooks and hanging the garland on the top surface. Semi-permanent hooks also makes it easy to layer different garlands, especially in this DIY without adding nails into your mantle.

I also created another beaded décor piece using the same beads but instead, I also added birch pieces and painted them with chalk paint to make it a chalkboard.

To make the beaded garland I bought big bags of wooden beads, and the thought of painting them all individually was too much. To help you paint your beads in only a short amount of time I have an awesome hack.
You will need:
- Wooden beads
- Wooden barbeque skewers
- Cardboard box
- Spray paint colours of choice
- Mask
- Pair of latex gloves
- Twine
Step one:

- Start with a wooden barbeque skewer.
- You are going to put your beads onto it leaving a few inches on each end.
- Use any size bead you want.
Step two:

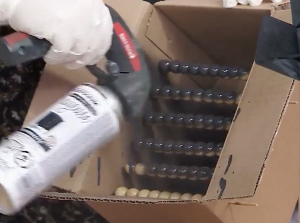
- Second, we are going to place the skewers inside a cardboard box.
- I pre-punctured some holes so that it’s easy to slide them through.
- Make sure you are using a cardboard box that is a few inches narrower than your skewers so that you have handles on either side.
Step three:

- Now we are going to paint the beads.
- I have chalk paint that comes in spray paint to give the beads a matte look.
- Put your mask on because the spray paint scent is quite strong
- Spray the paint into the box to cover the beads, rotate them from the sides to get them fully covered.
Step four:

- Once they are covered in paid and left to dry, grab one end of the skewer and pull
- All of the beads will fall into the box
- Thread all of the beads onto the twine
You can also use this technique to create gift tags to match gift wrapping!


