Jan
01
01
6 Low-Fuss Hair Trends To Look Out For In 2021
[bc_video video_id="6240597012001" account_id="2226196965001" player_id="rkljM4WDEg"]
With salons having to shut down, re-open, and shut down again, our hair game has reached a whole new “independent” level. The first few years of a decade often give us a good idea of what to expect in terms of fashion and beauty. Hair Stylist Jason Lee shares what to look for this year, and how we can update our look with the latest hair trends.
Trend #1: Layers and Mullets
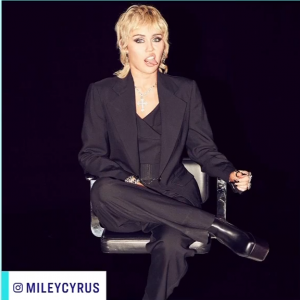
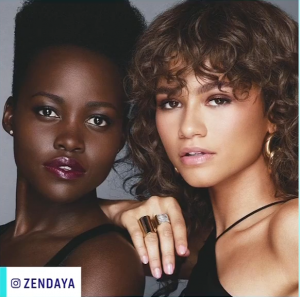
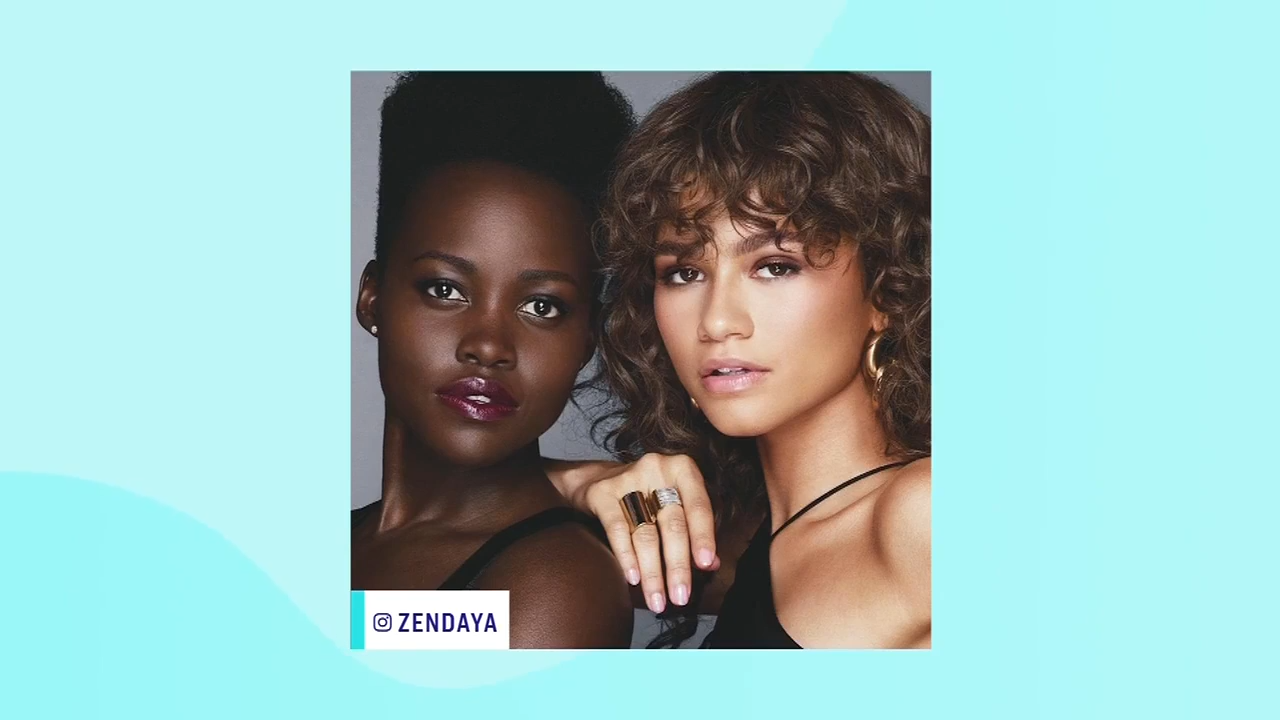
Let’s start off with haircuts and where they’re heading. After years of flat grown out layers, we’re seeing a return to shags, mullets and layered haircuts. We can look at people like Keke Palmer, Rihanna, Miley Cyrus and Zendaya for hair inspo. Miley went the way of the mullet, but if that's a little too fashion forward for you, don't worry. A shagged out haircut with bangs like Zendaya might be more your style. The idea is to create layers throughout the hair to accentuate bone structure. It’s a great way to wear your hair in its natural texture. The main take away from this point is that layers are back!
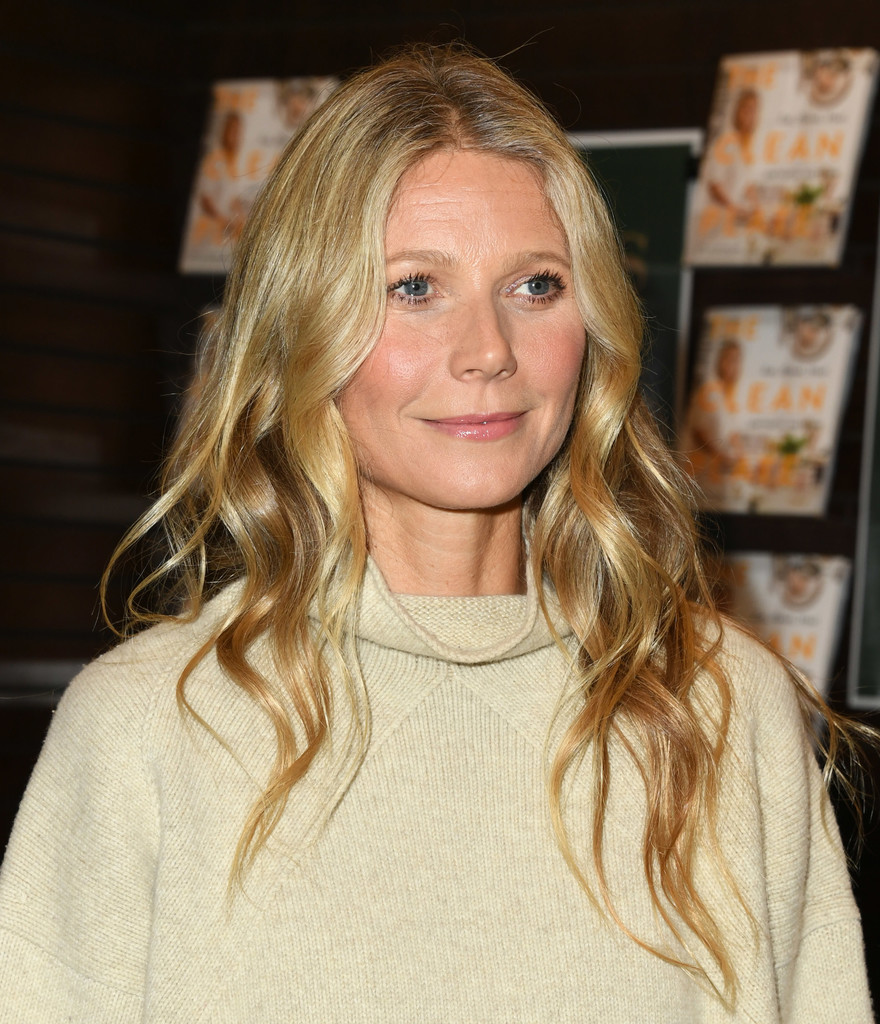
 Trend #2: Low-Key London-Style Waves
A mullet may not be for everyone, but if you’re someone who has worn waves in their hair for the last while, rest assured that they aren’t going anywhere either. Waves in the hair are becoming more laid back, however, a-la Gwyneth Paltrow. We're seeing styles go even further towards a more natural and undone look - maybe because of the world we're living in!
Trend #2: Low-Key London-Style Waves
A mullet may not be for everyone, but if you’re someone who has worn waves in their hair for the last while, rest assured that they aren’t going anywhere either. Waves in the hair are becoming more laid back, however, a-la Gwyneth Paltrow. We're seeing styles go even further towards a more natural and undone look - maybe because of the world we're living in!
 Trend #3: The Bob
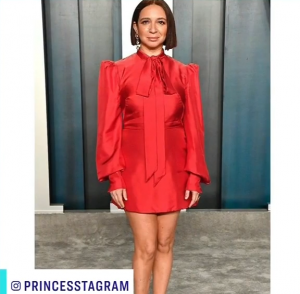
We think glam is going to make a major comeback. It might be a while until that trend becomes reality, but the pendulum always swings back. After a year of top knots with gray roots, we think the hunger for glamour and fashion will bring us back to a put-together, classy bob. Nothing is more glamorous when it comes to hair than a good bob. This year, we think bobs will be coming back around, possibly with a fringe. A bob just dresses up any outfit perfectly and appears so stylish when worn well. Not only that, but a bob could be worn curly, could be worn super straight like Maya Rudolph or could be worn with layers. There's a lot of versatility with this look, so go nuts!
Trend #3: The Bob
We think glam is going to make a major comeback. It might be a while until that trend becomes reality, but the pendulum always swings back. After a year of top knots with gray roots, we think the hunger for glamour and fashion will bring us back to a put-together, classy bob. Nothing is more glamorous when it comes to hair than a good bob. This year, we think bobs will be coming back around, possibly with a fringe. A bob just dresses up any outfit perfectly and appears so stylish when worn well. Not only that, but a bob could be worn curly, could be worn super straight like Maya Rudolph or could be worn with layers. There's a lot of versatility with this look, so go nuts!
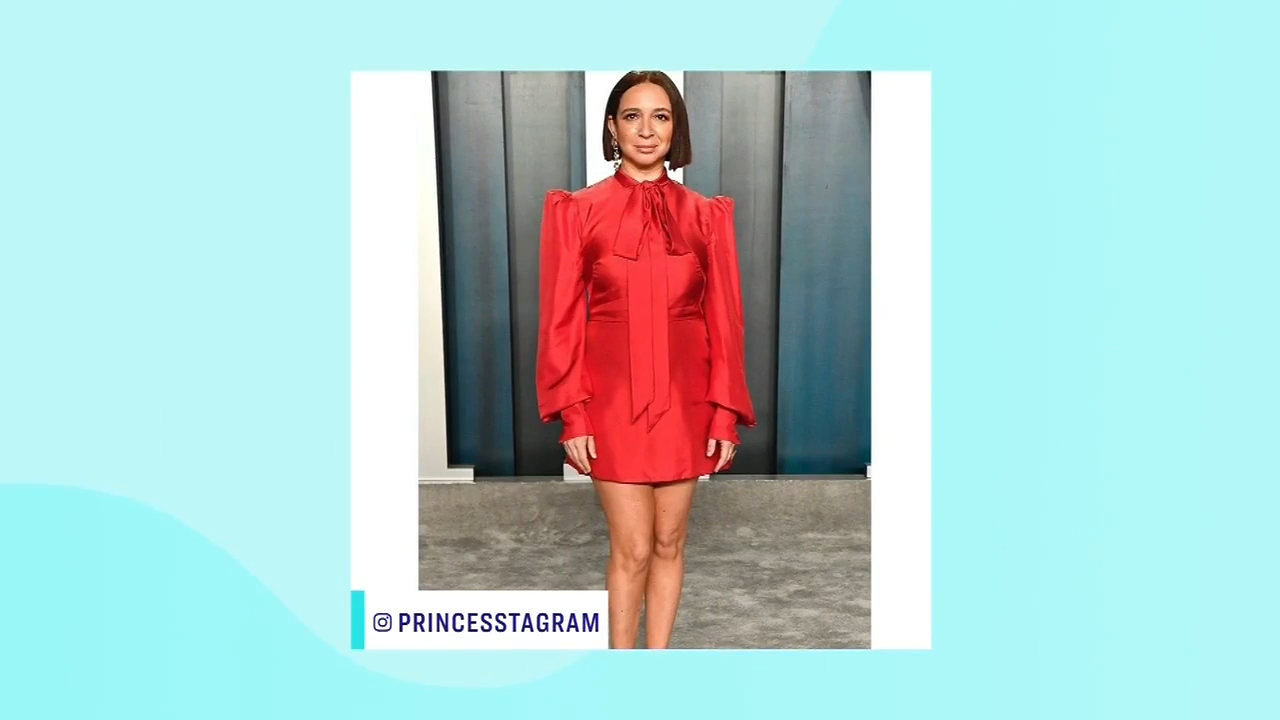
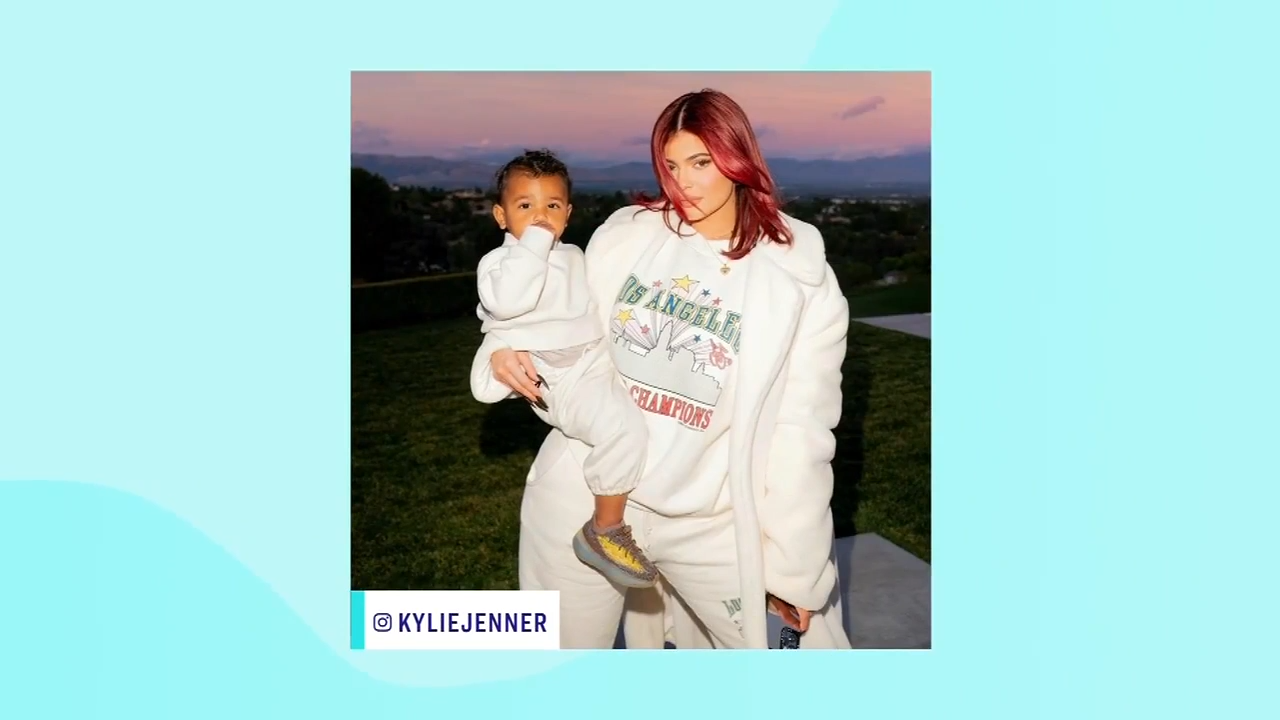
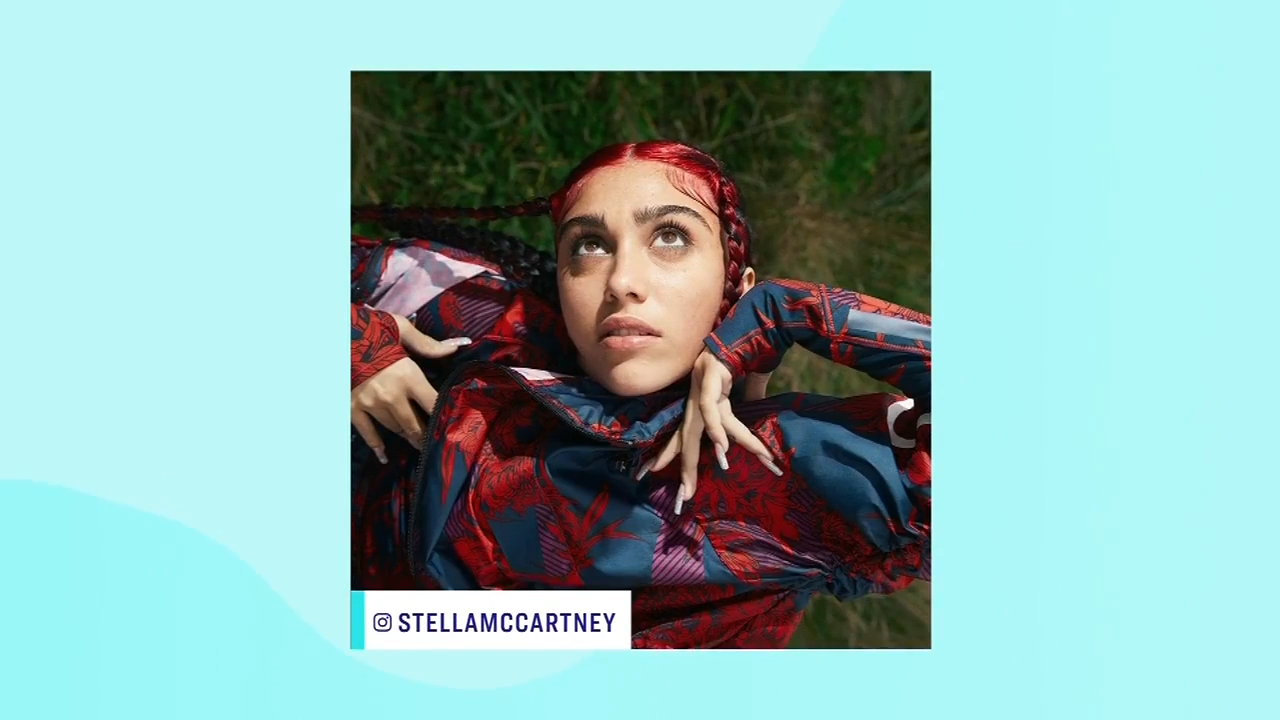
 Trend #4: Red-Auburn Tones
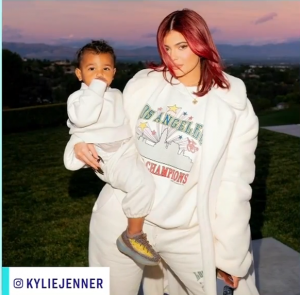
Now let's talk colour. One colour we haven’t seen as a major trend for a long time is red, but this tone is definitely becoming hot right now. Keke Palmer, Kylie Jenner and Lourdes Leon have all opted for vibrant red tones, whether for the full head or just segments. This look is super in at the moment, so if you've ever wanted to be a redhead, now's the time!
Trend #4: Red-Auburn Tones
Now let's talk colour. One colour we haven’t seen as a major trend for a long time is red, but this tone is definitely becoming hot right now. Keke Palmer, Kylie Jenner and Lourdes Leon have all opted for vibrant red tones, whether for the full head or just segments. This look is super in at the moment, so if you've ever wanted to be a redhead, now's the time!
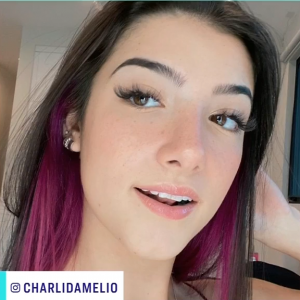
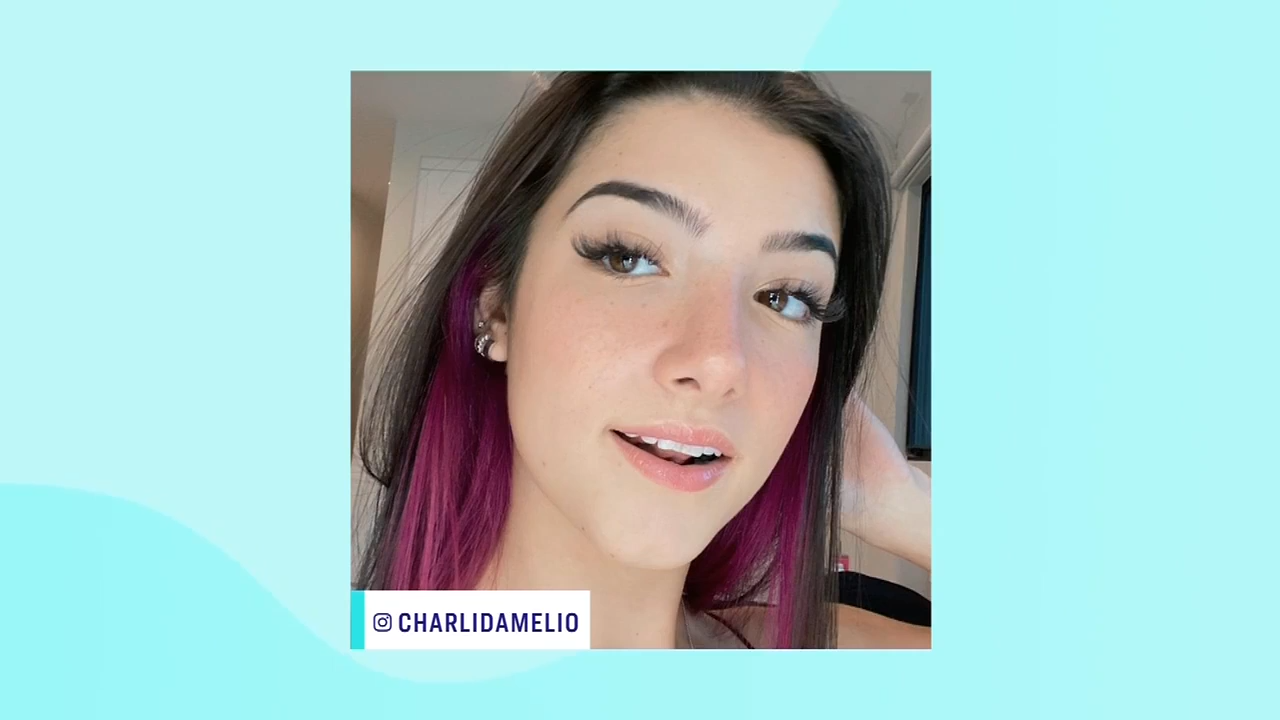
 Trend #5: Underlights
Here's a new technique that's storming the scene! The idea here is to place bold highlights sporadically through the hair, almost hidden beneath the rest of the hair. The TikTok generation has adopted the look for themselves, after the famous star Charlie Dimelio. If you don't know Charlie, she has 37 million followers on Instagram and is one of the biggest social media stars today. The idea behind this look is that there's a bold statement hidden away, and it will be interesting to see how it evolves over time.
Trend #5: Underlights
Here's a new technique that's storming the scene! The idea here is to place bold highlights sporadically through the hair, almost hidden beneath the rest of the hair. The TikTok generation has adopted the look for themselves, after the famous star Charlie Dimelio. If you don't know Charlie, she has 37 million followers on Instagram and is one of the biggest social media stars today. The idea behind this look is that there's a bold statement hidden away, and it will be interesting to see how it evolves over time.
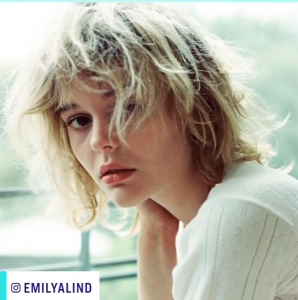
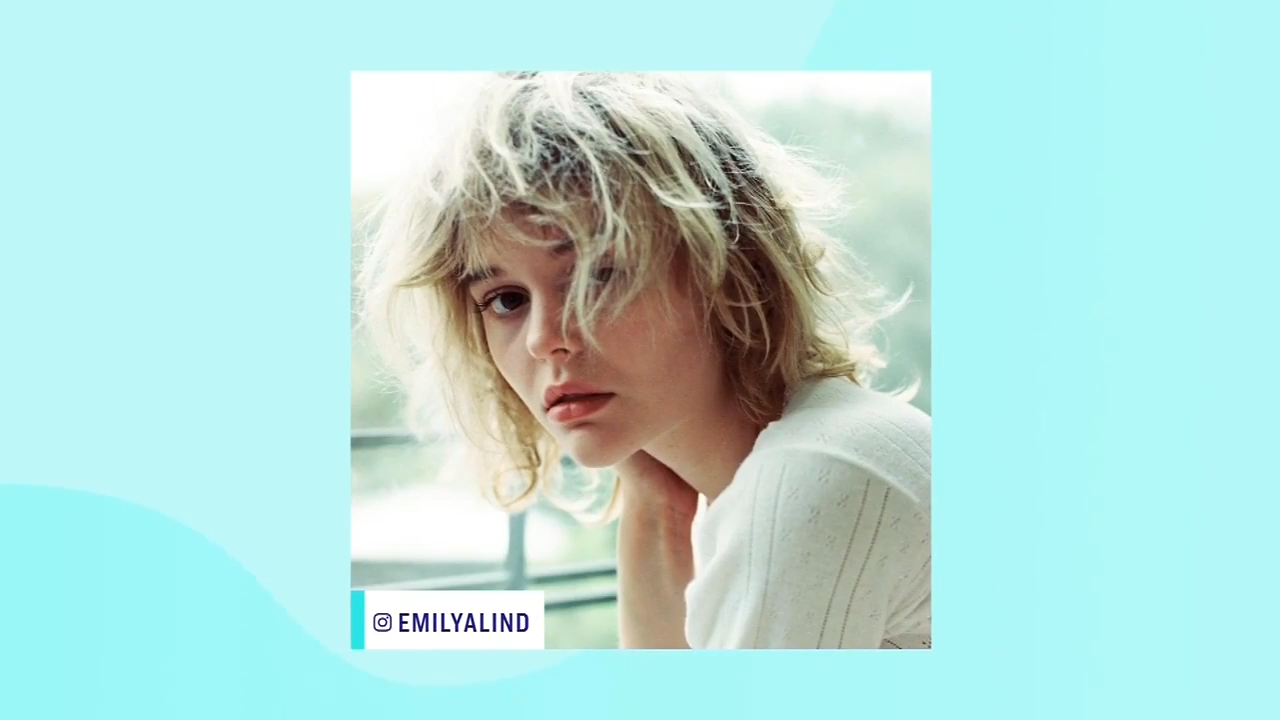
 Trend #6: Grown-Out Blonde
This look is a bit inspired by the lockdown hair of blondes everywhere who couldn't get to the salon! This look is blonde roots purposely grown out, which gives a bit of dimension to the blonde tone. It's also not as harsh against the skin. Actress Emily Lind is a great example of this, with fresh hair that has just a touch of blonde root.
Trend #6: Grown-Out Blonde
This look is a bit inspired by the lockdown hair of blondes everywhere who couldn't get to the salon! This look is blonde roots purposely grown out, which gives a bit of dimension to the blonde tone. It's also not as harsh against the skin. Actress Emily Lind is a great example of this, with fresh hair that has just a touch of blonde root.
 So there's the inside scoop. Let us know if you'll be adopting any of these new hair trends in the coming year!

 Trend #2: Low-Key London-Style Waves
A mullet may not be for everyone, but if you’re someone who has worn waves in their hair for the last while, rest assured that they aren’t going anywhere either. Waves in the hair are becoming more laid back, however, a-la Gwyneth Paltrow. We're seeing styles go even further towards a more natural and undone look - maybe because of the world we're living in!
Trend #2: Low-Key London-Style Waves
A mullet may not be for everyone, but if you’re someone who has worn waves in their hair for the last while, rest assured that they aren’t going anywhere either. Waves in the hair are becoming more laid back, however, a-la Gwyneth Paltrow. We're seeing styles go even further towards a more natural and undone look - maybe because of the world we're living in!
 Trend #3: The Bob
We think glam is going to make a major comeback. It might be a while until that trend becomes reality, but the pendulum always swings back. After a year of top knots with gray roots, we think the hunger for glamour and fashion will bring us back to a put-together, classy bob. Nothing is more glamorous when it comes to hair than a good bob. This year, we think bobs will be coming back around, possibly with a fringe. A bob just dresses up any outfit perfectly and appears so stylish when worn well. Not only that, but a bob could be worn curly, could be worn super straight like Maya Rudolph or could be worn with layers. There's a lot of versatility with this look, so go nuts!
Trend #3: The Bob
We think glam is going to make a major comeback. It might be a while until that trend becomes reality, but the pendulum always swings back. After a year of top knots with gray roots, we think the hunger for glamour and fashion will bring us back to a put-together, classy bob. Nothing is more glamorous when it comes to hair than a good bob. This year, we think bobs will be coming back around, possibly with a fringe. A bob just dresses up any outfit perfectly and appears so stylish when worn well. Not only that, but a bob could be worn curly, could be worn super straight like Maya Rudolph or could be worn with layers. There's a lot of versatility with this look, so go nuts!
 Trend #4: Red-Auburn Tones
Now let's talk colour. One colour we haven’t seen as a major trend for a long time is red, but this tone is definitely becoming hot right now. Keke Palmer, Kylie Jenner and Lourdes Leon have all opted for vibrant red tones, whether for the full head or just segments. This look is super in at the moment, so if you've ever wanted to be a redhead, now's the time!
Trend #4: Red-Auburn Tones
Now let's talk colour. One colour we haven’t seen as a major trend for a long time is red, but this tone is definitely becoming hot right now. Keke Palmer, Kylie Jenner and Lourdes Leon have all opted for vibrant red tones, whether for the full head or just segments. This look is super in at the moment, so if you've ever wanted to be a redhead, now's the time!
 Trend #5: Underlights
Here's a new technique that's storming the scene! The idea here is to place bold highlights sporadically through the hair, almost hidden beneath the rest of the hair. The TikTok generation has adopted the look for themselves, after the famous star Charlie Dimelio. If you don't know Charlie, she has 37 million followers on Instagram and is one of the biggest social media stars today. The idea behind this look is that there's a bold statement hidden away, and it will be interesting to see how it evolves over time.
Trend #5: Underlights
Here's a new technique that's storming the scene! The idea here is to place bold highlights sporadically through the hair, almost hidden beneath the rest of the hair. The TikTok generation has adopted the look for themselves, after the famous star Charlie Dimelio. If you don't know Charlie, she has 37 million followers on Instagram and is one of the biggest social media stars today. The idea behind this look is that there's a bold statement hidden away, and it will be interesting to see how it evolves over time.
 Trend #6: Grown-Out Blonde
This look is a bit inspired by the lockdown hair of blondes everywhere who couldn't get to the salon! This look is blonde roots purposely grown out, which gives a bit of dimension to the blonde tone. It's also not as harsh against the skin. Actress Emily Lind is a great example of this, with fresh hair that has just a touch of blonde root.
Trend #6: Grown-Out Blonde
This look is a bit inspired by the lockdown hair of blondes everywhere who couldn't get to the salon! This look is blonde roots purposely grown out, which gives a bit of dimension to the blonde tone. It's also not as harsh against the skin. Actress Emily Lind is a great example of this, with fresh hair that has just a touch of blonde root.
 So there's the inside scoop. Let us know if you'll be adopting any of these new hair trends in the coming year!
Jan
01
01
How To Give Yourself Beach Waves Without Applying Heat
[bc_video video_id="6229264050001" account_id="2226196965001" player_id="rkljM4WDEg"]
Wanting to style your hair, without applying heat? Michelle Finlayson from Schwarzkopf shows you how through a technique reminiscent of a technique used in the Victorian era called “rag curls”.
Instead of rags, use a bathrobe tie - and it's easy! Here are the steps:
 Michelle's hair after 1 day:
 After 2 days:

- Place the middle of the tie at the centre of your part (make sure it hangs evenly on each side, and is as long as the length of your hair).
- Apply a light spritz of setting spray or water throughout the lengths to prep it before wrapping.
- Wrap the hair around the tie starting at the top front (wrap away from the face – over to the back, then under to the front).
- The thicker the tie, the looser the wave so if you want a tighter curl you can use something thinner like a silk scarf. Make sure to keep the sections smooth and tight as you wrap, and add another section of hair as you come to the front each time.
- Secure the tips of the hair to the tie at the very bottom with a small elastic.
- Twist the entire section again away from the face up to tighten it up then secure by wrapping into a bun using the end of the tie or a scrunchie.
- Leave it in at least 3-4 hours – or overnight.
- Snip the elastics and remove the tie, gently one section at a time and style it.
- Loosen up the curls and add some texture spray and hairspray to finish.
 Michelle's hair after 1 day:
 After 2 days:


Jan
01
01
3 Products To Achieve Salon Hair At Home
[bc_video video_id="6209638057001" account_id="2226196965001" player_id="rkljM4WDEg"]
You may be finding it hard to re-create salon hair styles at home - but with any of these 3 products, this feat may be easier than you think.
It’s pretty simple to achieve a salon finish hair style at home. The key is using the right hair tools and getting comfortable with doing it yourself.
1.Diffuser
 I want to start off with a diffuser. A diffuser is a fabulous option to style curly textured hair especially in the winter months when its to cold to go outside with wet hair. Sometimes they can come as an attachment with your blow dryer.
For people who have curly textured hair, here’s what you need to know to make it work best. Start off with making sure to put product on wet hair then start to diffuse by placing the diffuser in and away from the head and making sure that you don’t stay in the same spot for too long. The trick to diffusing is by not touching the hair very much and let the diffuser do its job with those tiny little fingers they usually have on the ends.
Size
The size does matter, the bigger round diffusers cater more to longer hair because it allows you to get more hair into the mouth of the diffuser, the smaller ones are for shorter hairstyles which allows to get in closer and detail with the smaller tool.
Another tip is at about the 50 percent drying mark, you need to add a bit more product, usually gel, to give the hair a little control before finishing it off. After the gel, start diffusing again until its about 90 percent dry, at that point leave it alone and let the natural texture settle into its own shape.
2. Hair Dryer
I want to start off with a diffuser. A diffuser is a fabulous option to style curly textured hair especially in the winter months when its to cold to go outside with wet hair. Sometimes they can come as an attachment with your blow dryer.
For people who have curly textured hair, here’s what you need to know to make it work best. Start off with making sure to put product on wet hair then start to diffuse by placing the diffuser in and away from the head and making sure that you don’t stay in the same spot for too long. The trick to diffusing is by not touching the hair very much and let the diffuser do its job with those tiny little fingers they usually have on the ends.
Size
The size does matter, the bigger round diffusers cater more to longer hair because it allows you to get more hair into the mouth of the diffuser, the smaller ones are for shorter hairstyles which allows to get in closer and detail with the smaller tool.
Another tip is at about the 50 percent drying mark, you need to add a bit more product, usually gel, to give the hair a little control before finishing it off. After the gel, start diffusing again until its about 90 percent dry, at that point leave it alone and let the natural texture settle into its own shape.
2. Hair Dryer
 To purchase this product, click here.
This next tool is the Revlon One Step Hair Dryer &Volumizer Hot Air Brush. Your going to grab a section of hair and then simply start blow drying the section from roots to ends, you don’t need to force it or over spin the brush/tool…you just want to guide is through and allow it to do it’s job. So basically the brush and blow dryer are built into one.
The other thing I want to mention is if you want to wear your hair flipped out, you put the brush on top of your hair and blow dry it down. I think it’s a great little tool and does double duty but not double the time. Its not that expensive as you can find it in some retailers for about $55-60.
3. Steampod
To purchase this product, click here.
This next tool is the Revlon One Step Hair Dryer &Volumizer Hot Air Brush. Your going to grab a section of hair and then simply start blow drying the section from roots to ends, you don’t need to force it or over spin the brush/tool…you just want to guide is through and allow it to do it’s job. So basically the brush and blow dryer are built into one.
The other thing I want to mention is if you want to wear your hair flipped out, you put the brush on top of your hair and blow dry it down. I think it’s a great little tool and does double duty but not double the time. Its not that expensive as you can find it in some retailers for about $55-60.
3. Steampod
 To purchase this product, click here.
This next tool came to me through an industry friend. It’s a very new product just coming out on the market that is taking flat ironing to a new level. It’s called the Steampod. What’s cool about is it’s a professional use product, which means it’s the exact same tool we would use in salon, that you can also purchase to use at home.
The same way you flat iron normally, this item adds steam in the hair which acts as an extra level of hydration resulting in shiny, healthy looking hair. It has a small container attached to the side of the tool that you fill with water and it’s the water that allows the tool to create that steam that is infused to the hair fibres.
Depending on the look you’re trying to achieve and the texture of your hair. If it’s curly and you’re aiming for a straighter look, you’ll need to run it through a few times and one of the advantages of this is it has a built in comb that helps detangle the hair while you’re straightening.
To purchase this product, click here.
This next tool came to me through an industry friend. It’s a very new product just coming out on the market that is taking flat ironing to a new level. It’s called the Steampod. What’s cool about is it’s a professional use product, which means it’s the exact same tool we would use in salon, that you can also purchase to use at home.
The same way you flat iron normally, this item adds steam in the hair which acts as an extra level of hydration resulting in shiny, healthy looking hair. It has a small container attached to the side of the tool that you fill with water and it’s the water that allows the tool to create that steam that is infused to the hair fibres.
Depending on the look you’re trying to achieve and the texture of your hair. If it’s curly and you’re aiming for a straighter look, you’ll need to run it through a few times and one of the advantages of this is it has a built in comb that helps detangle the hair while you’re straightening.
Jan
01
01
Here's How To Care For Your Favourite Hair Tools
[bc_video video_id="6207722829001" account_id="2226196965001" player_id="rkljM4WDEg"]
Searching for a new hair dryer or iron can be complicated, and overwhelming with so many options. We reached out to our hair styling pro Jason lee to give you the rundown on what to look for and how to care for those tools!
Blow dryers and irons are an expensive investment, but remember, good quality tools can last for many years, so you want to make a smart decision. Buying the right items and taking proper care of them will ultimately help make them last longer and the investment worthwhile.
I get all of my hair care needs at a small mom and pop shop owned by the Moon family in downtown Toronto called Cosmetic World. This cozy little spot has everything: blow dryers, flat irons, hair extensions and tools! Now if you’re in an area that doesn’t have a ‘cosmetic world’, I thought it would be helpful if I broke down how I choose my tools along with how to take care of them.
 Blow dryers
Often when looking at buying a blow dryer, I feel for weight because when you’re holding one of these things for a long time to blow-dry your entire head of hair, they can get heavy. So, weight is important and nowadays a lot of blow dryers aren’t as bulky as they used to be, but beyond weight is the strength and power.
I look for blow dryers that go up to 2000 watts for those with thicker hair, but for those with finer hair, you don't need that level of power. Having a cool air button is a great feature to help lock down that cuticle so the hair doesn’t get frizzy, but you should also have multiple settings of heat and of strength so that you can customize settings for your hair type, for example those with finer hair, don't need to go to full blast as it could be too harsh on their hair. I like to go into retail spaces when possible and feel the weight and balance of a blow dryer to figure out what feels the most comfortable.
How to take care of your blow dryer:
Blow dryers
Often when looking at buying a blow dryer, I feel for weight because when you’re holding one of these things for a long time to blow-dry your entire head of hair, they can get heavy. So, weight is important and nowadays a lot of blow dryers aren’t as bulky as they used to be, but beyond weight is the strength and power.
I look for blow dryers that go up to 2000 watts for those with thicker hair, but for those with finer hair, you don't need that level of power. Having a cool air button is a great feature to help lock down that cuticle so the hair doesn’t get frizzy, but you should also have multiple settings of heat and of strength so that you can customize settings for your hair type, for example those with finer hair, don't need to go to full blast as it could be too harsh on their hair. I like to go into retail spaces when possible and feel the weight and balance of a blow dryer to figure out what feels the most comfortable.
How to take care of your blow dryer:
 Irons
With both flat irons and curling irons, you have tourmaline and ceramic irons. Both are great materials to get your irons in, ceramic ultimately helps to create a nice smooth glide through the hair and is great for finer hair. Tourmaline, is perfect for those who have frizzier hair because it helps with neutralizing the ionic charge in the hair. What does that mean? Tourmaline basically creates a negative ionic charge and basically doesn’t dry out the hair. Tourmaline is also great because it heats up evenly and you get a very even heat distribution. Titanium is very similar to Tourmaline irons but the difference is that it can heat up higher so that makes it better for coarse or hard hair to smoothen out.
How to take care of your irons:
There will always be product build up on your irons so it’s important to remember to wipe down the plates of your irons regularly especially if you see product build up like hairspray or other sticky products. Possibly every couple of months depending on your usage, you want to really go at it!
Irons
With both flat irons and curling irons, you have tourmaline and ceramic irons. Both are great materials to get your irons in, ceramic ultimately helps to create a nice smooth glide through the hair and is great for finer hair. Tourmaline, is perfect for those who have frizzier hair because it helps with neutralizing the ionic charge in the hair. What does that mean? Tourmaline basically creates a negative ionic charge and basically doesn’t dry out the hair. Tourmaline is also great because it heats up evenly and you get a very even heat distribution. Titanium is very similar to Tourmaline irons but the difference is that it can heat up higher so that makes it better for coarse or hard hair to smoothen out.
How to take care of your irons:
There will always be product build up on your irons so it’s important to remember to wipe down the plates of your irons regularly especially if you see product build up like hairspray or other sticky products. Possibly every couple of months depending on your usage, you want to really go at it!
 Blow dryers
Often when looking at buying a blow dryer, I feel for weight because when you’re holding one of these things for a long time to blow-dry your entire head of hair, they can get heavy. So, weight is important and nowadays a lot of blow dryers aren’t as bulky as they used to be, but beyond weight is the strength and power.
I look for blow dryers that go up to 2000 watts for those with thicker hair, but for those with finer hair, you don't need that level of power. Having a cool air button is a great feature to help lock down that cuticle so the hair doesn’t get frizzy, but you should also have multiple settings of heat and of strength so that you can customize settings for your hair type, for example those with finer hair, don't need to go to full blast as it could be too harsh on their hair. I like to go into retail spaces when possible and feel the weight and balance of a blow dryer to figure out what feels the most comfortable.
How to take care of your blow dryer:
Blow dryers
Often when looking at buying a blow dryer, I feel for weight because when you’re holding one of these things for a long time to blow-dry your entire head of hair, they can get heavy. So, weight is important and nowadays a lot of blow dryers aren’t as bulky as they used to be, but beyond weight is the strength and power.
I look for blow dryers that go up to 2000 watts for those with thicker hair, but for those with finer hair, you don't need that level of power. Having a cool air button is a great feature to help lock down that cuticle so the hair doesn’t get frizzy, but you should also have multiple settings of heat and of strength so that you can customize settings for your hair type, for example those with finer hair, don't need to go to full blast as it could be too harsh on their hair. I like to go into retail spaces when possible and feel the weight and balance of a blow dryer to figure out what feels the most comfortable.
How to take care of your blow dryer:
- Tip #1: I always tell people, that when you wrap up your chord when putting your blow dryer away, you want to leave a little bit of slack when wrapping your chord before putting it away. This will help avoid wires breaking down over time. A lot of people tie it super tight, and that can be an issue as it can affect the wires.
- Tip #2: We talked about this last time, but it’s also important to clean out the back of your vent to avoid all of that lint and hair getting stuck in the back vent which actually makes your motor work overtime. Best advice is to take a toothbrush and some warm water, and just clean out the back vent roughly once a month.
 Irons
With both flat irons and curling irons, you have tourmaline and ceramic irons. Both are great materials to get your irons in, ceramic ultimately helps to create a nice smooth glide through the hair and is great for finer hair. Tourmaline, is perfect for those who have frizzier hair because it helps with neutralizing the ionic charge in the hair. What does that mean? Tourmaline basically creates a negative ionic charge and basically doesn’t dry out the hair. Tourmaline is also great because it heats up evenly and you get a very even heat distribution. Titanium is very similar to Tourmaline irons but the difference is that it can heat up higher so that makes it better for coarse or hard hair to smoothen out.
How to take care of your irons:
There will always be product build up on your irons so it’s important to remember to wipe down the plates of your irons regularly especially if you see product build up like hairspray or other sticky products. Possibly every couple of months depending on your usage, you want to really go at it!
Irons
With both flat irons and curling irons, you have tourmaline and ceramic irons. Both are great materials to get your irons in, ceramic ultimately helps to create a nice smooth glide through the hair and is great for finer hair. Tourmaline, is perfect for those who have frizzier hair because it helps with neutralizing the ionic charge in the hair. What does that mean? Tourmaline basically creates a negative ionic charge and basically doesn’t dry out the hair. Tourmaline is also great because it heats up evenly and you get a very even heat distribution. Titanium is very similar to Tourmaline irons but the difference is that it can heat up higher so that makes it better for coarse or hard hair to smoothen out.
How to take care of your irons:
There will always be product build up on your irons so it’s important to remember to wipe down the plates of your irons regularly especially if you see product build up like hairspray or other sticky products. Possibly every couple of months depending on your usage, you want to really go at it!
- Make sure your iron is not hot and then I spray an iron cleaner and I let it sit before wiping off.
- If you don’t have an iron cleaning solution, it’s possible to use little bit of rubbing alcohol as an alternative. Just pour a touch on a towel and wipe off the build up.

Jan
01
01
A Hairstylist's Tips For Trimming Curly Hair (And Not Regretting It)
[bc_video video_id="6196810093001" account_id="2226196965001" player_id="rkljM4WDEg"]
What causes our ends to split?
The main reason why our ends split is due to friction and excessive manipulation which can cause the outer layer of our hair cuticle to begin to split. This can cause excessive damage which can lead to breakage.
Curly hair is more prone to split ends because it can often be dry and brittle. If these split ends are not trimmed within a reasonable time frame they can travel up the shaft of the hair causing breakage leaving your curls looking stringy. For curly girls, length retention is one of our main concerns and in order to retain our length we must keep up with our trims.
Curly hair should be trimmed every three to four months. In the salon the number one concern my clients have is that their hair doesn't grow and that is not the case. Your hair is always growing, we aren't seeing the length because the hair is breaking before you can see any length.
What are some of the things to keep in mind when it comes to trimming our yown hair between salon visits?
A couple things to keep in mind when trimming your hair is to never to trim your curls wet; wet curls are always longer than dry curls. There is a huge risk that you can cut too much when wet. Cut your curls when they are completely dry and defined that is the best way to see and identify exactly where your split ends, also remember not to pull your curls down with too much tension, that also increases your chances of cutting to0 much.
What tools should you be using to cut your hair?
The best scissors to use to cut are hair cutting scissors. The sharper the better, dull scissors can cause split ends as well.
How much should you be taking off?
Small snips are best. 1/2 inch is more than enough - any more than that and you risk changing the entire shape of your overall hair cut. If you feel like you need to take off more, it is suggested to book an appointment with a curly hair specialist who specialize in cutting and shaping curly hair.
Can hair products fix split ends?
Products can mend split ends temporarily but a trim is your best solution.

